Finally rain. I never thought i'd say that. In Oregon. I actually drove on the freeway surounded by the familiar yet forgotten shrouds of flying water.
I don't know how others are. I couldn't help but peak at the other drivers steering wheels. I usually look for any sign that could show unsuspected maneuvers. As much as i can cause i cannot look behind too all the time...
But lately, maybe in the last few years many times i've been struck by a weird sensation as the other drivers don't realy steer their wheels but just gently wrap them with their hands waiting for the car to react...
I remember Mr.Google got approval to test driverless cars in other states. What if they're secretly doing it in Oregon too, with the cars they secretly bought from the government a few years ago, in large numbers, when before obamacare there was cashforclunckerscare? Maybe Oregon is more suitable for this, smaller and with fewer politicians to buy or blackmail?
And don't ask me who those drivers are, cause i've said it before...
Sunday, October 28, 2012
Earthquakes
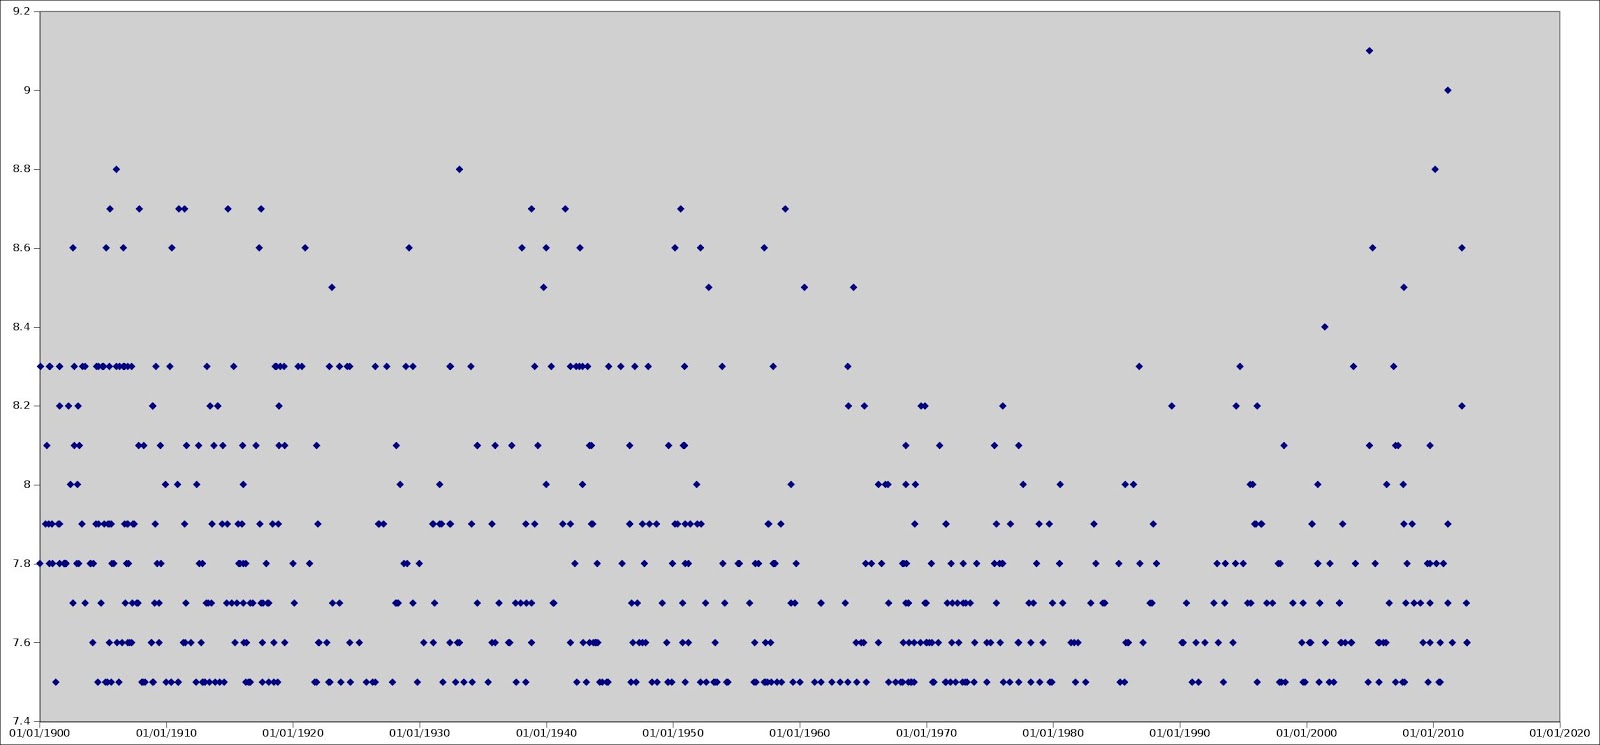 |
| Number and strength of earthquakes >7.4 1900-2011, gnumeric, screenshot. Click to enlarge |
Wednesday, October 24, 2012
Unprocessing Photographs
While using automatic exposure, from my own experience with film i saw better quality (exposure, color realism) than with digital.
That's why i say film photography is much more forgiving to bad exposure than digital, maybe with several steps on the indicator. To get the same quality like when using automatic exposure on film, with digital you often have to offset the exposure a bit in the... lucky direction. Some will say automatically, like i did for years after i bought my first digital cameras: There's always Photoshop. Based on rather impressive achievements based on it saw here and there and everywhere.
But then, by pure luck i saw on occasions that photographs heavily processed can be easily outperformed by the... non-processed ones.
Silver grains on a film saturate harder. They will always carry more meaningful information after a sightly offset exposure (and anyone who had worked on film can agree on this).
The current cameras' sensors translate light (actually the three "fundamental" colors) into numbers at the (split in three colors) pixel level and put those numbers into computer type files that are written on some type of memory organized the same way as computer files, usually Windows FAT32.
Their capabilities rely mainly on how many bits of information or color depth each physical pixel on the sensor can generate. Usually 10-14 bits per pixel per color in RAW file and 8 in compressed JPEG.
But after jumping from film to digital you will soon be unsatisfied. Go and spend hours on Photoshop with a picture and still won't be satisfied. Here's why.
10, 12, or 14 bits per color is not that much of a range. (Compared to the (almost) continuous (infinite) range on analog). That's why you have to use it properly. But to make things worse, JPEG and this is what your computer (by means of browser and other types of software) can display reduced the color depth to 8 bits per color, that is a total of 24 bits per pixel. Starting with amateur photographers we all know that 24 bits per pixel is one of the earliest standard for graphic cards. Nowadays the better settings and capabilities start with 32 and go to 48 and more. Too bad, cause there is no picture we can see at that resolution, even if we have now the cameras to generate them. The bottleneck is now JPEG and nobody seems to care.
Although i did not thoroughly researched this area, my experience tells me digital pixels saturate pretty fast when exposed non-carefully. That means that they will be almost all 8 corresponding to one color either 0 or 1 and carry no meaningful information when exposed to too much or too little light. Those are what we call the burnt pixels (not to be confounded with the defective, dead pixels sometimes present on sensors or displays as "accepted" fabrication mishaps). The dreaded blinking areas on a picture you just took seen on the playback display of some of the more advanced cameras.
Usually on current cameras there are several type of exposure indicators; classical metering arrays borrowed from later SLR cameras for film photography tied to the classical "scale indicator" in the bottom of the optical viewfinder, dense arrays with histograms, for compact cameras using directly the main sensor or DSLR with an extra "live" sensor or mirrorless or finally the displaying of the saturated (burnt) pixels areas on top of the resulted image in the form of blinking are (i saw these only for already taken pictures on certain cameras on certain display modes).
Unfortunately some designs of the current metering systems are taken directly from film era and not sufficiently upgraded for the technological differences with digital photography. That's why, if you use a classical metering system (not a "live" one, through main or auxiliary sensor) and want to raise quality, it is a good idea to balance exposure manually in order to
avoid those saturated areas and maximize your sensor's usage. One good way to do this, if you have time, is by trials, by eliminating, through compromise, as many as possible burnt pixels on both ends of the range and by doing this you will also have more meaningful
information on the whole (rest of the) range. In fewer words, if you adjust your exposure towards the middle of sensor's range on a maximum of sensor's area, you will have increased dynamics (the use in a meaningful way) on the entire numerical range corresponding to color depth of the sensor by having, ideally, one and only one burnt pixel on white, that is 0 in the same time with having one and only on color, that is 1) and/or increased information density (higher pixel count or "thicker" histogram on all color intensities) on the same subject, relatively to pictures taken with different, less than ideal, exposures. But this can be done only by looking at the resulting picture on the back display. And this takes time.
Next way to predict the quality of a picture is through live histogram. In digital photography, the word histogram is used to define a graph that has as X axis the intensity (or the numerical value of the pixels from white to color) and on/as Y the count of pixels of that intensity. Histograms sometimes come on each color, sometimes, like the "live" or real time ones on camera's displays, cumulative.
There are not many explanation on how to use a histogram in the manufacturers' manuals.
I read on forums many different interpretations of what it is and how to use it (the histogram), i assume some manufacturer added it as a feature and others followed but with no much explanation of what it is and how to use it, letting photographers and teachers to figure it out maybe for them too. Below are a few examples.
And finally the scale indicator tied to the metering array. With experience, by categorizing type of scenes, you will learn which scenes require adjustment and in what direction. Lately i came to use this in most of situations because of speed and convenience. However, from time to time i take a look at the final picture too.
Compressing, by using mathematical algorithms based on eye perception in order to reduce the size of the output file is possible by taking advantage of lower information density (at least in some areas) when transforming or packing adjusted raw files. If there are not big variations of numerical representations from one pixel to another in the whole picture, that is, less dynamics, the file will be smaller.
A good way to measure information density, besides histogram, is by how big the output file is compared to different one taken in identical conditions, in fast succession (bracketing) . The better the exposure, the bigger the output file.
(This could be a good idea for an exposure optimization algorithm, even in real time on the cameras of the future. (Generate and measure the size of a temporary file while bracketing exposure around the value suggested a by a metering array, even at a lower resolution or selected areas, for speed)).
I used earlier the word dynamics related to digital photography. I would make here an analogy with digital recording of the sound, when (instead of finding the optimal volume for recording,) you record at a lower volume, not using all the range of the analog to digital converter and never reaching the highest volume available for sampling on your analog to digital converter but instead using lower numbers and leaving part of the range unused.
Similarly, if your volume is too high, you would have saturation thus no meaningful information on those samples above the maximum range of the converter that would be all of the same value of the total depth or number of bits available (that would be all 1).
If you have more then one type of exposure measuring on the same camera, as it so happens on later models they usually tend to "disagree", sometimes by several steps. Best idea is to try to make a compromise between those. Using the classical indicator as refference, with time, you will learn that some type of scene require always the same type of exposure compensation in order to comporomise with histogram and final result.
You don't even need to learn the basic principles of photography in order to balance exposure manually. All digital cameras, compacts and DSLRs have now a function called exposure compensation. So you can use that feature on any type of automatic exposure program like aperture priority or totally automatic and tell the camera you want more or less exposure if you don't like what you see on the display after the first trial. (I do not ever correct more than 2 steps in each direction of the indicator even if the histogram (if i have time for it) tells me otherwise. I call it the common sense rule.)
You can't burn pixels if you use the histogram, but so far i haven't seen DSLRs with live histogram on the optical viewfinder.
There are some with live (real time) histogram on the LCD on the back and but framing through a display is not the same as through the optical viewfinder due to ambiental light or even sun that can fall on it and also the level of details and even comfort of holding the camera. So when it is possible and also necessary you can actually go back and forth the optical viewfinder and back display for framing and for the histogram, that sometimes that can be inconvenient.
Best way to balance exposure (if you have time) is by looking at the result on camera's playback display set on histogram (without actually using it) and trying to make the best compromise between saturated white and saturated colored (burnt) pixels (both ends of range) represented on most cameras on two different blinking colors on the actual picture (blinking areas of different colors indicating burnt pixels on 0 or 1). (If i'm lucky and don't have any burnt pixels after the first shot, and again i have time, i still try and play around trying to go for the maximum contrast, histogram in the middle and as thick as possible.)
Trouble is... when there is plenty of light you can't see well the picture on the back display for evaluating contrast... Sometimes i think on getting some sort of cap like photographers had for early photography on glass plates...
About processing. There is no software algorithm capable of predicting how a pixel would look as generated by a different light than the original.
Correcting through processing on the computer is way more timely and cannot ensure by far the same result, recover dynamics and especially cannot recover the burnt pixels (except for isolated ones by borrowing or averaging the nearby ones) but generally information once lost (again, a burnt or saturated pixel does not record anything) cannot be recreated. And even in the case of useful pixels, correcting through use of the linear or monotone algorithms the processing software probably uses (according to processing time and use of computer processor seen or observed during processing) is not the same thing as photographing the subject with the right exposure achieved through optical means because, by example in the case of compensating underexposed images, those algorithms simply multiply the values of each pixels or the opposite for overexposed. The same for increasing contrast, when they multiply more the corresponding value of the more intense pixels etc.
When the analog to digital converters samples light (colors) at the pixel level and converts it to numerical values it always rounds the result for the last or least significant bit, rounding implying loosing some information. We all know that if you multiply a rounded value, you will multiply the inherent rounding error as well. What happens when two adjacent pixels have been rounded but each having a different rounding error (one up and one down)? By multiplying those digitized values you will not get the same result as you would have gotten if you multiplied those value before digitizing. By experience, i can tell that if you try to correct through software more than 1-2 steps, you will destroy the quality of the image gathered with great effort and using such sophisticated and expensive optics (in fact what you do is magnify errors, the loss has already occurred at exposure time).
A good way to prove this would be through taking a good picture, process it to simulate underexposure by lowering brightness, save the result, reload it and then try to bring it back to the initial brightness, reversing the process, then compare the results.
I also leave all the settings on the camera that imply real time "on camera" software processing like contrast, sharpness, vivid, dynamic range, etc to normal or zero to make sure no on camera processing occurs at all as well. The only thing that's on is noise reduction on low light and the stabilizer that on better cameras is actually moving the sensor mechanically when trying to compensate for the unwanted motion of the camera).
Color temperature in photography is not the same thing as in physics but it imitates it. It is a convention that allows an adjustment of the final compressed displayable JPEG picture generated from the RAW file picked directly from the sensor based on the light conditions during taking the picture.
We need that adjustment for the same reason our eyes adapt to different color temperatures between dawn and dusk and allow us to see the objects somehow of similar colors making the light source differences bearable for our perception.
We all know that a hotter light source puts out a bluer light and a colder a more red one from physics in school. It is the opposite of our perception or intuition of colder light as warm, like red and hotter lights as cold like blue. Maybe that's why is so confusing to many beginners. Probably because we associate (psychologically) the blue color of the sky with cold and the red color of the fire with warm.
The equivalent color temperatures of light sources in visual range are well beyond our thermal sensory capabilities. As an example, an incandescent bulb filament actually has a temperature of 2700 degrees K and a flash plasma 6800. The surface of the Sun is 5,778 K. What would those temperature be for our skin? Not much difference.
With Sun's actual surface temperature in mind, let's think about the equivalent color temperature of the light on the surface of Earth on an average sunny day at noon which is about 5500 K. Why? Because of the filtering of the atmosphere, that scatters some of the blue photons in all directions preventing them to reach surface directly thus its blue color and cooling the light reaching the surface a little making it a little redder. (As i said in the previous paragraph, the total opposite of our intuition). The effect is much stronger at dawn and sunset where light comes at a steeper angle and has to travel more through air.
There are also light sources that are not hot or barely warm like LEDs that put out equivalents of daylight color temperatures. So it's not really about temperature but the composition or mixture of different visible wavelengths of the light source, or how much of each color(wavelength) has a hot source of an equivalent temperature.
All the colors we see around come usually from the same "white" light that gets reflected in different ways on different objects that absorb some of the colors and reflect others. White light is actually a mixture of colors and not always the same (but we perceive a range of mixtures as white light due to eye adaptation). (We are too used to these things and do not think of them or never did). But if the light source is unbalanced and puts out more colors than others the camera has to know for reference what the eye or brain or whatever does automatically for us and that is the equivalent temperature of the light source in order to transform a RAW file into a JPEG or directly generate a JPEG that would be compatible with our perception of the real image in that light, perception given by the automatic adjustment of our eyes.
There is an automatic function which directs the camera to detect the average color composition of the light on the sensor. In fact the only option most photographers use. But what if the chosen composition of the image is unbalanced like when taking a picture of a red tree in the fall that occupies most of the area of the sensor? The camera will average the framed image "thinking", as programmed, that the average should be white while that red tree is occupying most of the frame, or sensor, will over-correct and the result would be a cold, bluer looking red tree.
There are ways to measure the color temperature of the light source. A notorious one that i've tried until i learned enough is the camera's main sensor and a gray card. A gray card is an A4 piece of cardboard with some gray paint on it. You can calibrate the camera with by taking a picture of the card placed in the vicinity of the subject using camera's specialized function to measure color temperature just before taking the picture in the same light. But after a little experimentation that lasted several months i learned to do without.
Most of the situations between sunrise and sunset come in the range between 5500 and 5700. Then it goes quickly all the way to 7500 within a half hour after sunset then when we are starting to loose color perception into the light condition we perceive as dark but not completely night quickly all the way up to the limit of the setting of the camera.
Flash is 6800 but if the camera is on automatic it will know you used it.
There are cameras with settings like daylight (5500), clouds (5700), incandescent (2700), flash (6800) etc. So you don't have to set the color temperature but just to recognize the type of light and set it on the camera.
For color temperature, any manual approximate setting is better than automatic.
During daytime is better if you leave it on daylight or cloudy all day long then on automatic. You can have at most 100 or 200 degrees difference when shooting outside in different conditions which is less than if the camera picks automatically the wrong correction and it does so too often. A little effort to learn how to set it and you will have dramatically improved pictures with less or no necessary correction through processing (if you still want to do processing after reading this).
If you have degrees settings for white balance on your camera if you set at 5500 you are covered in 99% of daylight situations. Unless if i'm in the middle of a field with no clouds and the sun is above me when i use 5500. Or in a forest on a cloudy day when i use 5600 or 5700 towards the evening. Or... you can start playing around and make subjective photographs, over-correcting 100 degrees in one way or another. + for a warmer impression or - for a colder one according to everything i tried to say before. And you will want to give a colder impression in a forest so you better live it on 5600!. If you don't have degrees settings the best setting is on daylight or cloudy, depending on the situation, camera and results. (some cameras work better on cloudy even if there's sunlight). But not on automatic!
I set the camera for output both RAW and JPEG. But i never use the RAW files, i just keep them for reference just in case. The camera manufacturers are very interested in giving you the best possible JPEG directly out of the camera because there are many people that don't use RAWs so i just use those. I used for a while the converting software that came with the camera to generate JPEGs out of RAWs on the computer. But it had a very slight tendency of turning the pictures towards green. I like better the JPEGs that come directly from the camera. But just in case you don't like the colors on the final JPEG or simply didn't have time to set the color temperature on the camera at the time you took the picture, you can always generate a new JPEG out of the RAW on the computer adjusting the color temperature. And this is not processing but merely imitating the generation of the JPEG file on the camera.
In the RAW file color temperature information is not contained within pixels as is in JPEG but is just a parameter in the file's header. The information in each pixel in the RAW file comes directly from the sensor's physical pixels as it was when you took the photograph. After converting to JPEG the correction is taken from there and included in each pixel. Reprocessing a JPEG file just for adjusting colors or for any reason is the worst possible idea. You should always use RAWs as source for processing, if possible. However there are softwares that allow this for the reason that many photographers are not aware of the options and choices given by using RAW files or simply because they use cameras that do not have that output option or they must correct an older JPEG photograph.
Now that i write this i remember a conversation i had with someone a few days ago. I agree now that by using optical filters towards sunset you may level the color balance and increase the amount of useful information or dynamics in the RAW file on the colors that are less intense due to imbalance of the source and decrease the more saturated ones by purely optical means. Doing this, you should limit the amount of correction by adjusting the color temperature parameter when generating the jpeg file. But i also believe this is necessary in the areas where correction exceeds +/- 1500 K. When close to 5500 there are no major differences in dynamics on different color information coming straight from the sensor with no filters and i like the freedom of not needing to fiddle with filters while on a photography trip.

5600 - Mixed light: Sun, and clouds.
6000 - Mixed light: daylight, fluorescent, flash, done by trials.
9900, 7+ Magenta, almost night, by trials (LOL had to be quick), beyond the camera capabilities. Everything is too blue.
Since on current processing software adjusting focus is an option (is more like an imitation or simulation of focus adjustement), true focusing adjustment can only be achieved through optics, a few words on that too.
Many current cameras won't let you shoot unless they achieved focus that is detected through various means. But the big problems is the angular motion or angular speed of the optical axis of the camera in the moment that button clicks. Most cameras have a shutting button based on a two step switch. It's a switch that has one or two flat slightly spherically shaped springs that deform when pushed then pop, delivering a high switching speed but also a tiny, non neglectable mechanical momentum in the moment of popping. By pressing half it pops once and the camera measures light and focuses. By fully pressing it pops again and sometimes slightly shakes the camera. That mechanical momentum tends to give the camera an angular motion enough to blure the image. Everything is ruined because of that.
My experience tell me that most of blurred shots are because of that. There is no remedy to it except holding the camera, squeezing as opposed to pushing the button, and praying not to move. Lately i discovered a new trick. If you bypass the first step that implies focusing and metering, and push it quickly to the end and keeping it like that, most cameras will have a slight delay due to focusing and metering time that can go up from several tenth to a full second, enough time to mechanically stabilize the camera.
Short of using a mono-pod, a tripod or other mechanical fixture that holds the camera in place. The smaller and lighter the camera is, the more likely to get blurred images because of angular motion of the camera while pressing the button.
That's why i say film photography is much more forgiving to bad exposure than digital, maybe with several steps on the indicator. To get the same quality like when using automatic exposure on film, with digital you often have to offset the exposure a bit in the... lucky direction. Some will say automatically, like i did for years after i bought my first digital cameras: There's always Photoshop. Based on rather impressive achievements based on it saw here and there and everywhere.
But then, by pure luck i saw on occasions that photographs heavily processed can be easily outperformed by the... non-processed ones.
Silver grains on a film saturate harder. They will always carry more meaningful information after a sightly offset exposure (and anyone who had worked on film can agree on this).
The current cameras' sensors translate light (actually the three "fundamental" colors) into numbers at the (split in three colors) pixel level and put those numbers into computer type files that are written on some type of memory organized the same way as computer files, usually Windows FAT32.
Their capabilities rely mainly on how many bits of information or color depth each physical pixel on the sensor can generate. Usually 10-14 bits per pixel per color in RAW file and 8 in compressed JPEG.
But after jumping from film to digital you will soon be unsatisfied. Go and spend hours on Photoshop with a picture and still won't be satisfied. Here's why.
10, 12, or 14 bits per color is not that much of a range. (Compared to the (almost) continuous (infinite) range on analog). That's why you have to use it properly. But to make things worse, JPEG and this is what your computer (by means of browser and other types of software) can display reduced the color depth to 8 bits per color, that is a total of 24 bits per pixel. Starting with amateur photographers we all know that 24 bits per pixel is one of the earliest standard for graphic cards. Nowadays the better settings and capabilities start with 32 and go to 48 and more. Too bad, cause there is no picture we can see at that resolution, even if we have now the cameras to generate them. The bottleneck is now JPEG and nobody seems to care.
Although i did not thoroughly researched this area, my experience tells me digital pixels saturate pretty fast when exposed non-carefully. That means that they will be almost all 8 corresponding to one color either 0 or 1 and carry no meaningful information when exposed to too much or too little light. Those are what we call the burnt pixels (not to be confounded with the defective, dead pixels sometimes present on sensors or displays as "accepted" fabrication mishaps). The dreaded blinking areas on a picture you just took seen on the playback display of some of the more advanced cameras.
Usually on current cameras there are several type of exposure indicators; classical metering arrays borrowed from later SLR cameras for film photography tied to the classical "scale indicator" in the bottom of the optical viewfinder, dense arrays with histograms, for compact cameras using directly the main sensor or DSLR with an extra "live" sensor or mirrorless or finally the displaying of the saturated (burnt) pixels areas on top of the resulted image in the form of blinking are (i saw these only for already taken pictures on certain cameras on certain display modes).
Next way to predict the quality of a picture is through live histogram. In digital photography, the word histogram is used to define a graph that has as X axis the intensity (or the numerical value of the pixels from white to color) and on/as Y the count of pixels of that intensity. Histograms sometimes come on each color, sometimes, like the "live" or real time ones on camera's displays, cumulative.
There are not many explanation on how to use a histogram in the manufacturers' manuals.
I read on forums many different interpretations of what it is and how to use it (the histogram), i assume some manufacturer added it as a feature and others followed but with no much explanation of what it is and how to use it, letting photographers and teachers to figure it out maybe for them too. Below are a few examples.
And finally the scale indicator tied to the metering array. With experience, by categorizing type of scenes, you will learn which scenes require adjustment and in what direction. Lately i came to use this in most of situations because of speed and convenience. However, from time to time i take a look at the final picture too.
Compressing, by using mathematical algorithms based on eye perception in order to reduce the size of the output file is possible by taking advantage of lower information density (at least in some areas) when transforming or packing adjusted raw files. If there are not big variations of numerical representations from one pixel to another in the whole picture, that is, less dynamics, the file will be smaller.
A good way to measure information density, besides histogram, is by how big the output file is compared to different one taken in identical conditions, in fast succession (bracketing) . The better the exposure, the bigger the output file.
 |
| High dynamics (the histogram touches both the right and left limit of the graph), low
information density (thin histogram), but due to the
monotonous nature of the subject, burnt pixels on white on an
insignificant area (the cloud on the upper left). Most of the pixels are in the thin
high intensity area on the right. Not major exposure or WB mistakes. If i
w Usually on current cameras there are several type of exposure indicators; classical metering arrays borrowed from later SLR cameras for film photography tied to the classical "scale indicator" in the bottom of the optical viewfinder, dense arrays with histograms, for compact cameras using directly the main sensor or DSLR with an extra "live" sensor or mirrorless and finally the displaying of the saturated (burnt) pixels areas on top of the resulted image (i saw these only for already taken pictures on certain cameras on certain display modes). ould have lowered exposure i would have had a more even histogram but unrealistic brightness colors and general look. |
 |
| High dynamics, high information density, well balanced histogram. However, the trees look unrealistic due to extreme contrast of the subject, but still discernible details and colors. General realistic impression. |
 |
| Pretty underexposed (with about on step) due to hurry to catch the subject and failure of the of the automatic exposure and lack of more manual compensation (it is only one step up) due to hurry - not so high dynamics (highest intensity pixels missing on the right side of the histogram). Under average information density (histogram thickness). Burnt pixels on white (histograms touches the upper limit on right only). Still useful to show for composition and dramatism. Still wouldn't get better through processing. |
Similarly, if your volume is too high, you would have saturation thus no meaningful information on those samples above the maximum range of the converter that would be all of the same value of the total depth or number of bits available (that would be all 1).
If you have more then one type of exposure measuring on the same camera, as it so happens on later models they usually tend to "disagree", sometimes by several steps. Best idea is to try to make a compromise between those. Using the classical indicator as refference, with time, you will learn that some type of scene require always the same type of exposure compensation in order to comporomise with histogram and final result.
You don't even need to learn the basic principles of photography in order to balance exposure manually. All digital cameras, compacts and DSLRs have now a function called exposure compensation. So you can use that feature on any type of automatic exposure program like aperture priority or totally automatic and tell the camera you want more or less exposure if you don't like what you see on the display after the first trial. (I do not ever correct more than 2 steps in each direction of the indicator even if the histogram (if i have time for it) tells me otherwise. I call it the common sense rule.)
You can't burn pixels if you use the histogram, but so far i haven't seen DSLRs with live histogram on the optical viewfinder.
There are some with live (real time) histogram on the LCD on the back and but framing through a display is not the same as through the optical viewfinder due to ambiental light or even sun that can fall on it and also the level of details and even comfort of holding the camera. So when it is possible and also necessary you can actually go back and forth the optical viewfinder and back display for framing and for the histogram, that sometimes that can be inconvenient.
Best way to balance exposure (if you have time) is by looking at the result on camera's playback display set on histogram (without actually using it) and trying to make the best compromise between saturated white and saturated colored (burnt) pixels (both ends of range) represented on most cameras on two different blinking colors on the actual picture (blinking areas of different colors indicating burnt pixels on 0 or 1). (If i'm lucky and don't have any burnt pixels after the first shot, and again i have time, i still try and play around trying to go for the maximum contrast, histogram in the middle and as thick as possible.)
Trouble is... when there is plenty of light you can't see well the picture on the back display for evaluating contrast... Sometimes i think on getting some sort of cap like photographers had for early photography on glass plates...
About processing. There is no software algorithm capable of predicting how a pixel would look as generated by a different light than the original.
Correcting through processing on the computer is way more timely and cannot ensure by far the same result, recover dynamics and especially cannot recover the burnt pixels (except for isolated ones by borrowing or averaging the nearby ones) but generally information once lost (again, a burnt or saturated pixel does not record anything) cannot be recreated. And even in the case of useful pixels, correcting through use of the linear or monotone algorithms the processing software probably uses (according to processing time and use of computer processor seen or observed during processing) is not the same thing as photographing the subject with the right exposure achieved through optical means because, by example in the case of compensating underexposed images, those algorithms simply multiply the values of each pixels or the opposite for overexposed. The same for increasing contrast, when they multiply more the corresponding value of the more intense pixels etc.
When the analog to digital converters samples light (colors) at the pixel level and converts it to numerical values it always rounds the result for the last or least significant bit, rounding implying loosing some information. We all know that if you multiply a rounded value, you will multiply the inherent rounding error as well. What happens when two adjacent pixels have been rounded but each having a different rounding error (one up and one down)? By multiplying those digitized values you will not get the same result as you would have gotten if you multiplied those value before digitizing. By experience, i can tell that if you try to correct through software more than 1-2 steps, you will destroy the quality of the image gathered with great effort and using such sophisticated and expensive optics (in fact what you do is magnify errors, the loss has already occurred at exposure time).
A good way to prove this would be through taking a good picture, process it to simulate underexposure by lowering brightness, save the result, reload it and then try to bring it back to the initial brightness, reversing the process, then compare the results.
I also leave all the settings on the camera that imply real time "on camera" software processing like contrast, sharpness, vivid, dynamic range, etc to normal or zero to make sure no on camera processing occurs at all as well. The only thing that's on is noise reduction on low light and the stabilizer that on better cameras is actually moving the sensor mechanically when trying to compensate for the unwanted motion of the camera).
Color temperature in photography is not the same thing as in physics but it imitates it. It is a convention that allows an adjustment of the final compressed displayable JPEG picture generated from the RAW file picked directly from the sensor based on the light conditions during taking the picture.
We need that adjustment for the same reason our eyes adapt to different color temperatures between dawn and dusk and allow us to see the objects somehow of similar colors making the light source differences bearable for our perception.
We all know that a hotter light source puts out a bluer light and a colder a more red one from physics in school. It is the opposite of our perception or intuition of colder light as warm, like red and hotter lights as cold like blue. Maybe that's why is so confusing to many beginners. Probably because we associate (psychologically) the blue color of the sky with cold and the red color of the fire with warm.
The equivalent color temperatures of light sources in visual range are well beyond our thermal sensory capabilities. As an example, an incandescent bulb filament actually has a temperature of 2700 degrees K and a flash plasma 6800. The surface of the Sun is 5,778 K. What would those temperature be for our skin? Not much difference.
With Sun's actual surface temperature in mind, let's think about the equivalent color temperature of the light on the surface of Earth on an average sunny day at noon which is about 5500 K. Why? Because of the filtering of the atmosphere, that scatters some of the blue photons in all directions preventing them to reach surface directly thus its blue color and cooling the light reaching the surface a little making it a little redder. (As i said in the previous paragraph, the total opposite of our intuition). The effect is much stronger at dawn and sunset where light comes at a steeper angle and has to travel more through air.
There are also light sources that are not hot or barely warm like LEDs that put out equivalents of daylight color temperatures. So it's not really about temperature but the composition or mixture of different visible wavelengths of the light source, or how much of each color(wavelength) has a hot source of an equivalent temperature.
All the colors we see around come usually from the same "white" light that gets reflected in different ways on different objects that absorb some of the colors and reflect others. White light is actually a mixture of colors and not always the same (but we perceive a range of mixtures as white light due to eye adaptation). (We are too used to these things and do not think of them or never did). But if the light source is unbalanced and puts out more colors than others the camera has to know for reference what the eye or brain or whatever does automatically for us and that is the equivalent temperature of the light source in order to transform a RAW file into a JPEG or directly generate a JPEG that would be compatible with our perception of the real image in that light, perception given by the automatic adjustment of our eyes.
There is an automatic function which directs the camera to detect the average color composition of the light on the sensor. In fact the only option most photographers use. But what if the chosen composition of the image is unbalanced like when taking a picture of a red tree in the fall that occupies most of the area of the sensor? The camera will average the framed image "thinking", as programmed, that the average should be white while that red tree is occupying most of the frame, or sensor, will over-correct and the result would be a cold, bluer looking red tree.
There are ways to measure the color temperature of the light source. A notorious one that i've tried until i learned enough is the camera's main sensor and a gray card. A gray card is an A4 piece of cardboard with some gray paint on it. You can calibrate the camera with by taking a picture of the card placed in the vicinity of the subject using camera's specialized function to measure color temperature just before taking the picture in the same light. But after a little experimentation that lasted several months i learned to do without.
Most of the situations between sunrise and sunset come in the range between 5500 and 5700. Then it goes quickly all the way to 7500 within a half hour after sunset then when we are starting to loose color perception into the light condition we perceive as dark but not completely night quickly all the way up to the limit of the setting of the camera.
Flash is 6800 but if the camera is on automatic it will know you used it.
There are cameras with settings like daylight (5500), clouds (5700), incandescent (2700), flash (6800) etc. So you don't have to set the color temperature but just to recognize the type of light and set it on the camera.
For color temperature, any manual approximate setting is better than automatic.
During daytime is better if you leave it on daylight or cloudy all day long then on automatic. You can have at most 100 or 200 degrees difference when shooting outside in different conditions which is less than if the camera picks automatically the wrong correction and it does so too often. A little effort to learn how to set it and you will have dramatically improved pictures with less or no necessary correction through processing (if you still want to do processing after reading this).
If you have degrees settings for white balance on your camera if you set at 5500 you are covered in 99% of daylight situations. Unless if i'm in the middle of a field with no clouds and the sun is above me when i use 5500. Or in a forest on a cloudy day when i use 5600 or 5700 towards the evening. Or... you can start playing around and make subjective photographs, over-correcting 100 degrees in one way or another. + for a warmer impression or - for a colder one according to everything i tried to say before. And you will want to give a colder impression in a forest so you better live it on 5600!. If you don't have degrees settings the best setting is on daylight or cloudy, depending on the situation, camera and results. (some cameras work better on cloudy even if there's sunlight). But not on automatic!
I set the camera for output both RAW and JPEG. But i never use the RAW files, i just keep them for reference just in case. The camera manufacturers are very interested in giving you the best possible JPEG directly out of the camera because there are many people that don't use RAWs so i just use those. I used for a while the converting software that came with the camera to generate JPEGs out of RAWs on the computer. But it had a very slight tendency of turning the pictures towards green. I like better the JPEGs that come directly from the camera. But just in case you don't like the colors on the final JPEG or simply didn't have time to set the color temperature on the camera at the time you took the picture, you can always generate a new JPEG out of the RAW on the computer adjusting the color temperature. And this is not processing but merely imitating the generation of the JPEG file on the camera.
In the RAW file color temperature information is not contained within pixels as is in JPEG but is just a parameter in the file's header. The information in each pixel in the RAW file comes directly from the sensor's physical pixels as it was when you took the photograph. After converting to JPEG the correction is taken from there and included in each pixel. Reprocessing a JPEG file just for adjusting colors or for any reason is the worst possible idea. You should always use RAWs as source for processing, if possible. However there are softwares that allow this for the reason that many photographers are not aware of the options and choices given by using RAW files or simply because they use cameras that do not have that output option or they must correct an older JPEG photograph.
Now that i write this i remember a conversation i had with someone a few days ago. I agree now that by using optical filters towards sunset you may level the color balance and increase the amount of useful information or dynamics in the RAW file on the colors that are less intense due to imbalance of the source and decrease the more saturated ones by purely optical means. Doing this, you should limit the amount of correction by adjusting the color temperature parameter when generating the jpeg file. But i also believe this is necessary in the areas where correction exceeds +/- 1500 K. When close to 5500 there are no major differences in dynamics on different color information coming straight from the sensor with no filters and i like the freedom of not needing to fiddle with filters while on a photography trip.
http://cdn.cambridgeincolour.com/images/tutorials/wb_bbdiagram.png
And for taking pictures without flash with fluorescent lamps as source the problem is more than color temperature which by the way is around 4500. You will need a filter to correct the holes in spectrum that fluorescent lamps have.
Here are a few examples about what i was talking above. Can click on each picture for better view.
Here are a few examples about what i was talking above. Can click on each picture for better view.
5600 - Mixed light: Sun, and clouds.
 |
| Lake Oswego, OR, street intersection. Click to enlarge |
6000 - Mixed light: daylight, fluorescent, flash, done by trials.
 |
| My place, 2012-10-20 09:26:18, click to enlarge |
9900, 7+ Magenta, almost night, by trials (LOL had to be quick), beyond the camera capabilities. Everything is too blue.
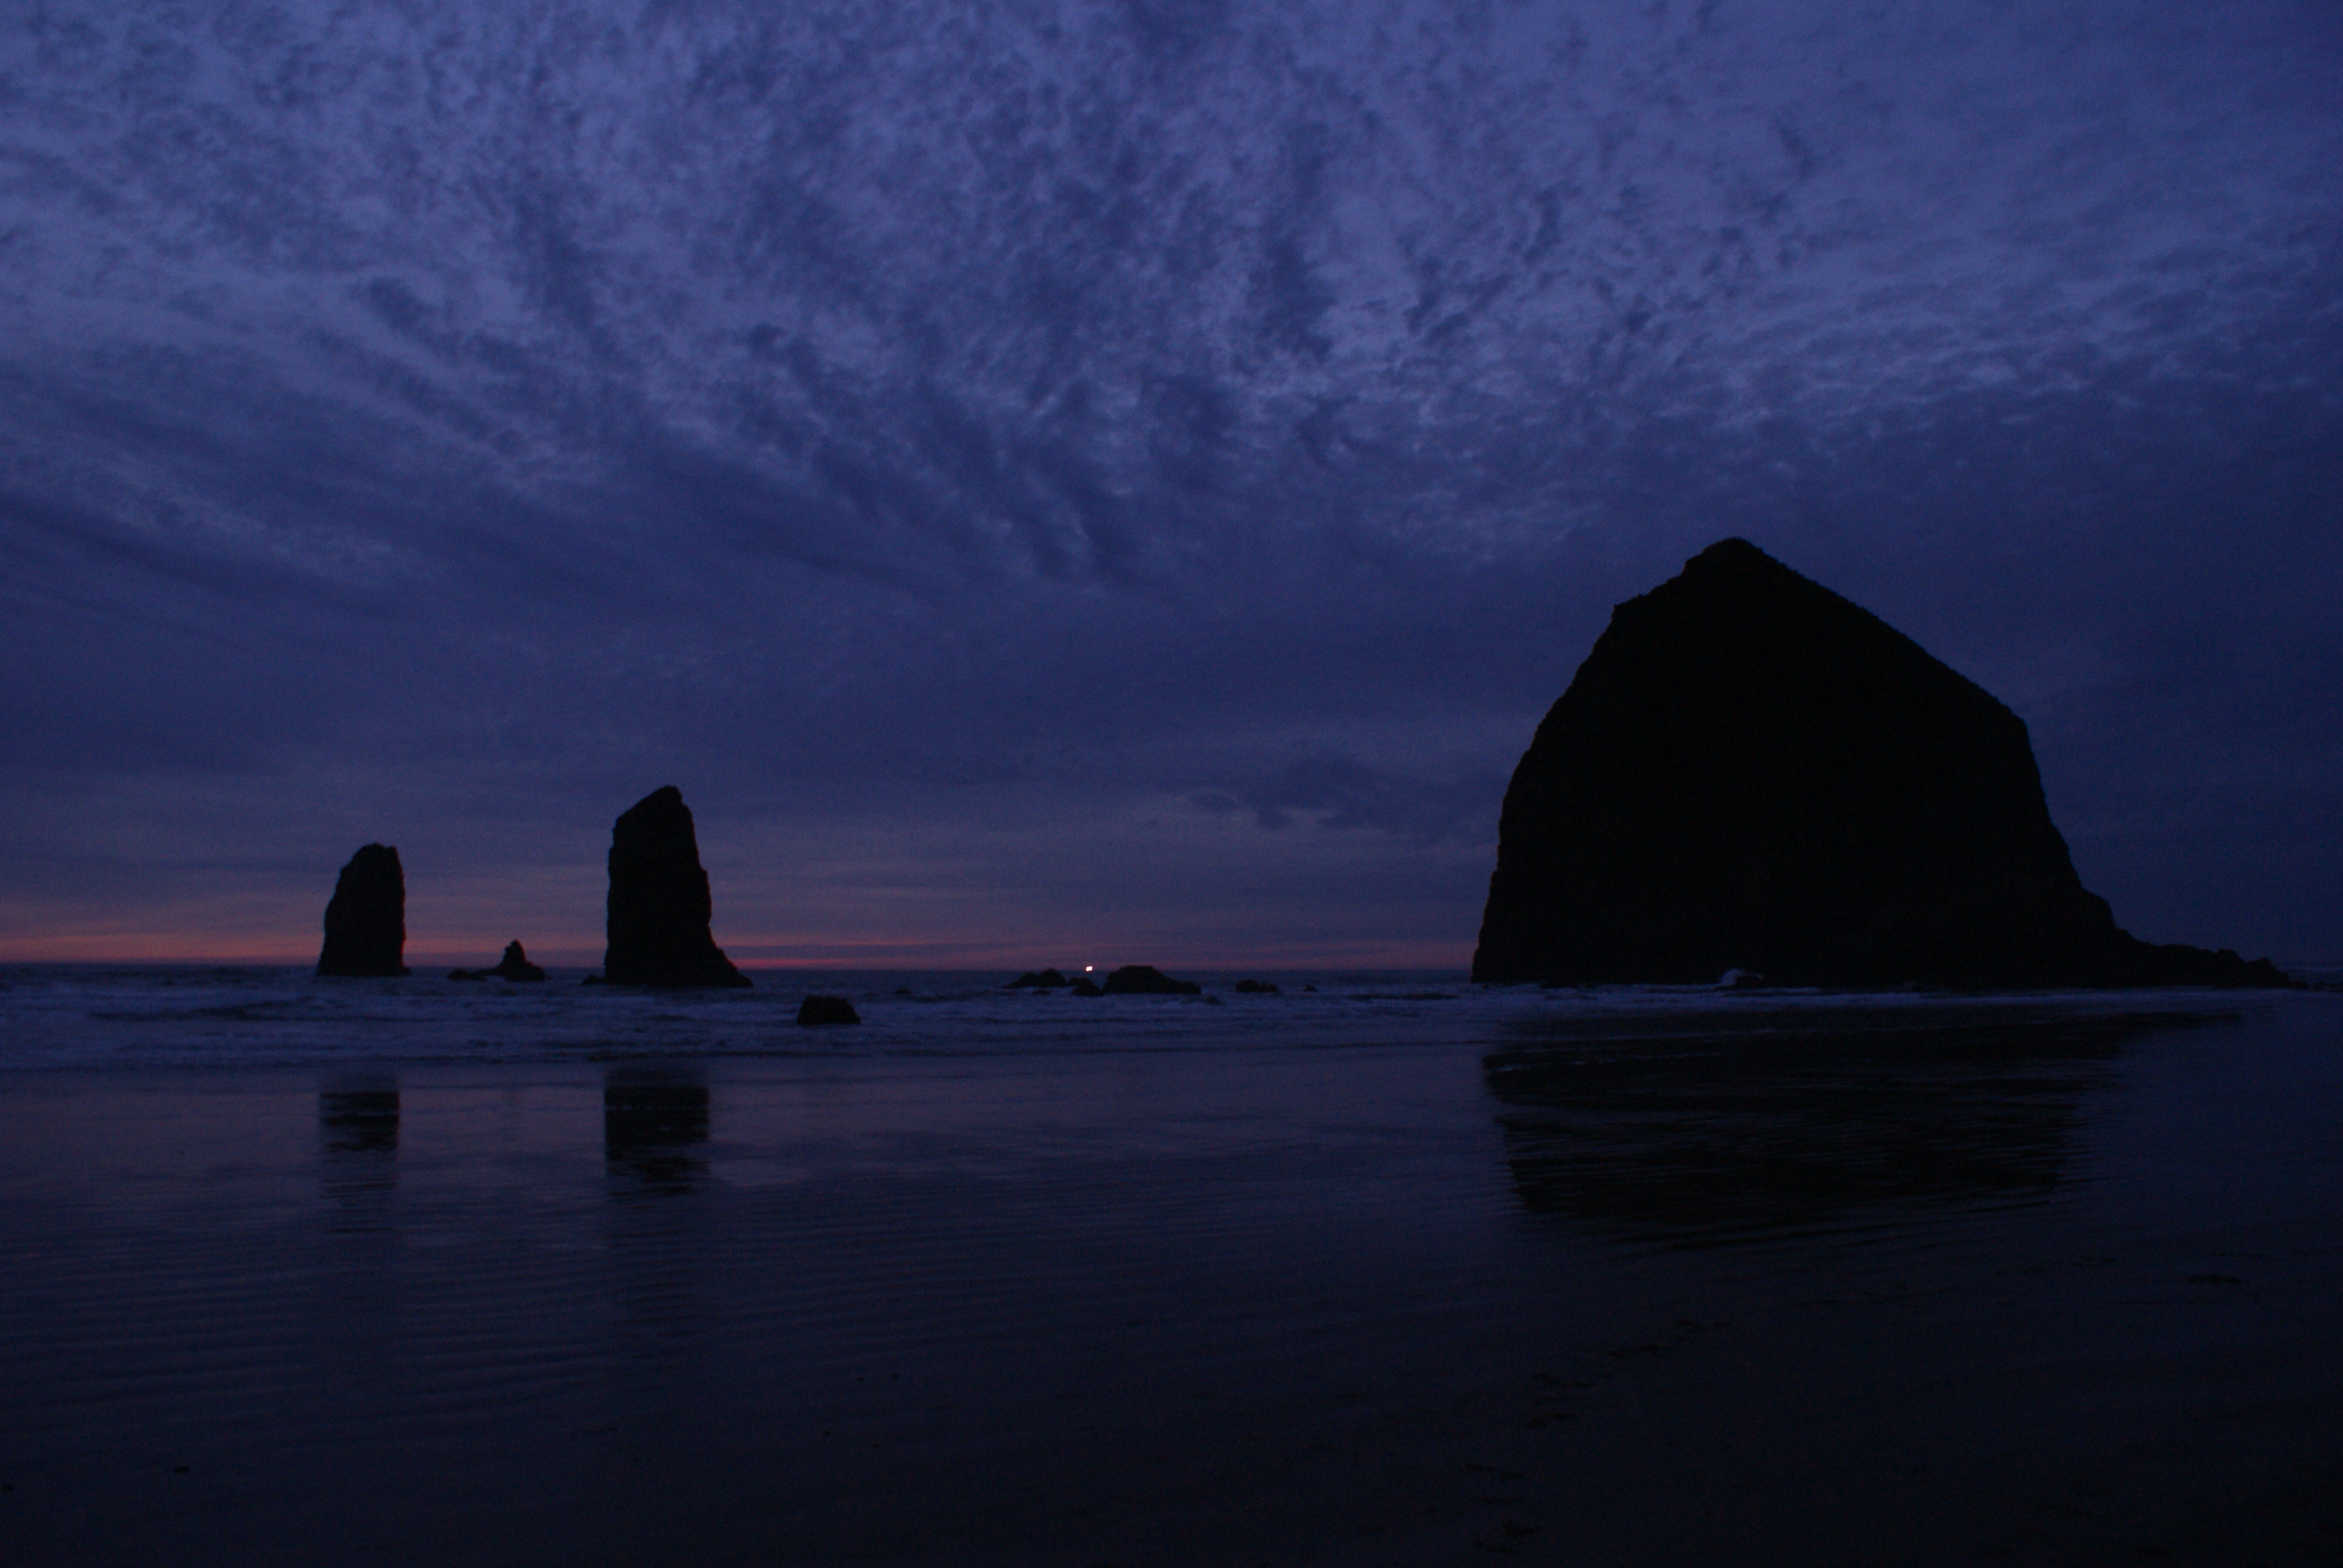 |
| January 29, 2012 at 9.54PM PST, Cannon Beach, OR. Click to enlarge. |
Many current cameras won't let you shoot unless they achieved focus that is detected through various means. But the big problems is the angular motion or angular speed of the optical axis of the camera in the moment that button clicks. Most cameras have a shutting button based on a two step switch. It's a switch that has one or two flat slightly spherically shaped springs that deform when pushed then pop, delivering a high switching speed but also a tiny, non neglectable mechanical momentum in the moment of popping. By pressing half it pops once and the camera measures light and focuses. By fully pressing it pops again and sometimes slightly shakes the camera. That mechanical momentum tends to give the camera an angular motion enough to blure the image. Everything is ruined because of that.
My experience tell me that most of blurred shots are because of that. There is no remedy to it except holding the camera, squeezing as opposed to pushing the button, and praying not to move. Lately i discovered a new trick. If you bypass the first step that implies focusing and metering, and push it quickly to the end and keeping it like that, most cameras will have a slight delay due to focusing and metering time that can go up from several tenth to a full second, enough time to mechanically stabilize the camera.
Short of using a mono-pod, a tripod or other mechanical fixture that holds the camera in place. The smaller and lighter the camera is, the more likely to get blurred images because of angular motion of the camera while pressing the button.